
Help! I am a Broke College Student That’s Sick of Ramen

October 26, 2021
Welcome to HIAABCSTSOR–a cooking blog of sorts for college students, by college students. This series is inspired by my own dilemma: a college student who cares about her health but also has to be money-smart. All while also trying out being an adult for the first time. Join us on our quest for good, nutritious, and simple food that hopefully won’t break the bank. We don’t know much, we’re not real adults here.
Recipe 3
“Ode to Anna’s Dad” Chili (no fancy slow-cookers required)
It’s fall. It’s chilly. Time to get cracking on some chili. This meal may be a bit of a “splurge” in some senses but you can make it as fancy or non-fancy as you like. I opted to make mine a little more decadent, because I was feeling a bit homesick.
I made this an ode to my dad because this is the first chili I’ve made as a broke college girl
living on her own. I followed no recipe–other than a phone call and several rushed texts to my dad as I shopped in a crowded Winco on a Saturday afternoon. Though I couldn’t follow all of his advice (such as adding a beer into the mix before you simmer, I am under 21 I can’t just go out and buy it!), I mentally transported myself back into his kitchen. What would Mr. Frazier do? Let’s try it out.
Ingredients and tools Needed:
Staples (stuff you probably have or wouldn’t hurt to stock up on):
- Olive oil
- Water
- Spices I like my chili spicy and multi-dimensional. I used approximately a buttload of chili powder, a mountain of cumin, a couple strong shakes of garlic powder, multiple dashes of cayenne, and a generous sprinkle of paprika. Play around with the spices to figure out what’s right for you! College is about learning.
- Minced garlic Either fresh or from a jar. I use about half a tablespoon, though I never measure.
- Rice Optional, but I personally like to serve my chili over rice. I used brown rice from a big Costco bag that will probably last me until I graduate. I have also served this in a hollowed out sourdough bread bowl.
- Big pot And I mean big! Can you fit a watermelon in it? No? Go bigger, if you can.
- Big spoon
- Sharp knife and cutting board
- Colander
- Can opener
Stuff to buy:
- Two 8 oz. cans of beans Always the funnest (most fun?) part of chili: the beans! Mix and match what you like! Most beans are less than a dollar per can (especially if you get the off-brand kind). I chose kidney and black beans. I recommend looking for the cans that are marked “low sodium” or “no salt added” as it’s very easy for a dish to be too salty. You can always add salt to your liking later, but you can’t take the salt out.
- One 8 oz. can of corn You will probably like the ones marked “whole kernel” the best for chili. And, as I mentioned before, go for the low- or no-sodium cans! This should also be less than a dollar.
- Two 8 oz. cans of diced tomatoes Again, they will be less than a dollar and you should look for non-salty ones. If you see a can marked “with green chillies” or similar, try that one! It will add more flavor. I used one can with chillies and one without.
- One small yellow onion (or about half of a big one)
- Meat or alternative Feel free to omit. I used three links of fully-cooked spicy chicken sausage (chopped into bite-sized pieces) that I got on sale and needed to use up. If ground meat, shredded chicken, or tofu is your preference, go ahead! Normally, meat and its alternatives are the most expensive part of the meal.
- Peppers Optional, but oh-so-worth-it. I was given a fresh jalapeño as a gift, so I used that as well as a red bell pepper I bought for 68 cents (on a whim) to make this a more well-rounded meal. My dad suggested using a poblano and an anaheim too, but I forgot to get them. He also grills or roasts his peppers whole first, but I did not have time for that–I was too hungry.
- Chili toppings Sour cream, shredded cheese, you name it. Note that if you buy these toppings for this recipe, it may be a lot cost-wise, but they will last you for several more meals. Sometimes it’s hard to remember that when you see the receipt.
Time to cook!
Note: if you are using raw meat, cook that separately before you begin. Have it drained of excess fat and set aside.
- Chop your fresh vegetables into bite-sized pieces or smaller.
- Put your large pot on medium-high heat on the stove. Add chopped veggies, minced garlic, and about a tablespoon of olive oil. Stir to distribute oil. Allow to cook for 8-10 minutes or until vegetables are softened, stirring occasionally.
- While your veggies are sizzling, open your cans of beans and corn. Rinse all three in the sink using a colander. Set aside.
- Add your spices to the pot and stir. Mine looked a little cakey at first so I was scared that I used too much. But don’t worry, my story has a happy ending.
- Open and dump the entire contents of both cans of diced tomatoes to the pot and stir. Using one of the empty cans, fill it halfway with water and pour into the pot. This is when my dad would say “use beer instead!” The alcohol will cook off, if this is the route you choose. Substitute legally-obtained beer for water using a 1:1 ratio.
- Add in your fully-cooked meat or meat alternative, if using. Stir in the set-aside beans and corn.
- Bring to a boil, then reduce to a simmer. I simmered for as long as it takes to cook a pot of brown rice (45-50 minutes, according to the package). Though there are no rules, I would aim for at least 30 minutes to enhance the flavor. During this time, your meat and beans will heat thoroughly and your peppers and onions will get tender, too!
- Serve alone or over rice, adding toppings as you see fit. Enjoy!
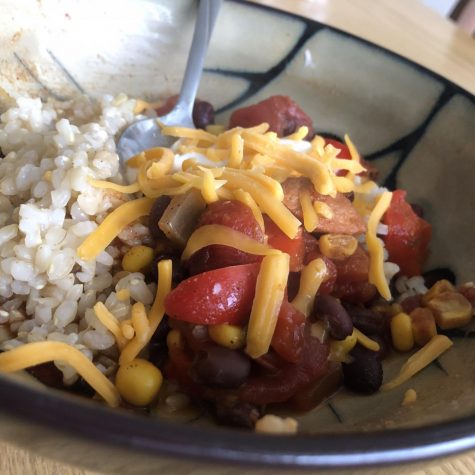
This made a ridiculous amount of chili, approximately 8 large portions or 10 regular-sized portions. Plan to either share with lots of friends or store for later. Chili should freeze well in a sealed container.
I’m trying to make my recipes as easy-to-follow as possible–with lots of annotations intended to help those who are new to cooking. Is this helpful? Comment your thoughts below!


Camille Cooper Lubach • Dec 7, 2021 at 11:23 am
This is awesome Anna! What a brilliant idea to share recipes for affordable meals for students.