Susty Cats: Food waste

There are plenty of sayings out there that attempt to help us regular mortals combat the environmental behemoth known as climate change. Eat less meat. Recycle your cans. Reduce plastic use. Don’t drive your car if you don’t need to.
Everyone has advice for you. But often, this advice is given freely (and without solicitation) sans any actual plans. What good do these broad solutions do if we don’t have the tools to carry them out?
We can’t solve the climate crisis by changing out our light bulbs, but we can do the best we can to stem the flow in that direction by taking small everyday actions. Susty Cats is a column for Linfield students, by Linfield students, with an emphasis on solutions-oriented reporting.
Reducing food waste on campus
Mention a college dining hall to a crowd of people, and I’m sure you’ll be met with a series of groans. They have a reputation for serving food that isn’t necessarily favored by students. However, our own Dillin Dining Hall has its merits
Dillin has plans for almost all its waste streams. Vegetable scraps and other similar pre-production waste is either reused (for stock, for example) or donated to a local farm to be converted into chicken feed. Linfield’s dining hall processes nearly all its produce in house–and that’s a lot of melon rinds that would otherwise make their way to the landfill.
Food that is ready-to-eat but unconsumed (think: all those trays of broccoli that are passed over in favor of pizza) is frozen and donated to a local food rescue and a church.
So diners at Dillin can rest easy knowing that a large portion of food at their dining hall doesn’t go to waste.
But what of upperclassmen, who tend not to utilize on-campus dining services? How can they reduce their food waste in their everyday lives?
Solution 1: On-Campus Composting
Littered among the recycling cans and garbage bins are receptacles labeled for compost. They look just like the others, but are usually green. These are free for students to use, just like the rest of the bins.
Vegetable and fruit scraps, egg shells, plant trimmings, coffee grounds, and more can all be dumped into that compost bin. Most college apartments have an in-home compost bucket that seals and can be emptied every few days.
Composting on campus is easy and free–as long as you remember to use it. In my personal experience, it’s best to empty the bin two to three times a week, or else you have to fish slimy banana peels out of the bottom.
Solution 2: Reusing scraps
There are a lot of things that are perfectly edible, yet are thrown away regularly. Some for good reason: just because I can eat onion skins, doesn’t mean I want to.
But it’s very easy to give scraps destined for the landfill (or compost bucket, if you read the solution above!) a second life.
Vegetable stock is essentially a strongly brewed tea of onions, tomatoes, carrots, and more. And it’s really easy to make. Below, I’ve created a step-by-step so you can incorporate waste reduction into your on-campus kitchen!
- Designate a large-ish container or gallon-sized Ziploc bag for scraps. Use something that is made to go in the freezer. I like to use reusable zippable bags.
- Over the next few weeks or months, as you use them, collect: onion skins and tops, carrot peels and tops, tomato ends, garlic skins, past-their-prime fresh herbs and their stems, celery tops and bottoms, mushroom stems and the ones that get too wrinkly, leek tops, and ginger peels. If a carrot or something gets a little too floppy, throw that in too. Try to remove dirt and don’t use anything that’s passed the threshold to moldiness or rot. Whenever you have some scraps to throw in, take out the bag from the freezer, shove it in, and replace it.
- For me, it took a little less than two months to collect enough scraps to fill my Dutch oven. It’s not an exact amount: the more you have in your pot, the more flavor you’ll get.
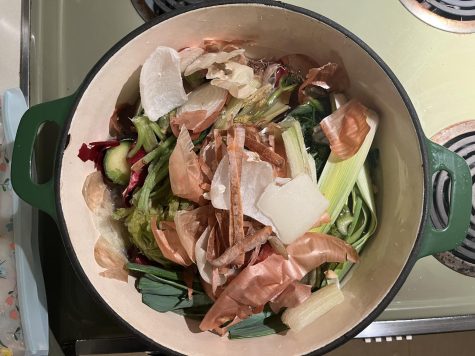
It took two bags of frozen vegetables to fill this Dutch oven. (Anna Frazier) - Once you have a sufficient amount of scraps (probably a stuffed gallon Ziploc or two), set aside an afternoon or evening that you’ll be home to make stock. Plan for at least two hours.
- Empty frozen contents directly into a heavy stock pot or Dutch oven. Fill the rest of the space with water to as high as possible without risk of it boiling over. For best flavor, throw in a small handful of whole peppercorns and a few bay leaves.
- Bring the mixture to a boil, then reduce to the gentlest simmer your stove can maintain. Cover with a lid but leave a gap for steam to escape. Allow to simmer for one to two hours.
- At this point, the mixture should be turning a nice nutty brown. Turn the heat off, and leaving the pot on the burner, completely cover with the lid and allow to “steep” for 45 minutes to an hour.

It’s important to let the stock “steep” like tea. (Anna Frazier) - If not cooled, remove the lid and allow it to cool a bit. Strain, using a colander. Squeeze as much liquid as you can out of the vegetable remains. Either throw these away or compost them.
- Use right away in soups, stews, chilis, and more (any place that calls for stock–remember though, this isn’t salted like most commercial stocks are so you will need to add extra salt to taste). Or, partition into plastic bags or containers and either store in the fridge and use within three days or freeze and use within three months.